


Checkerboard cork handles really make a custom fishing rod unique, and it is actually a fairly straight forward process. With just a few tools and a little bit of practice, you will have limitless design possibilities when building your next custom fishing rod handle.
Note: How to video at the end of this post.
Tools & Equipment Needed
Let’s take a look at the equipment & supplies you will need:
Cork Slicer – The cork slicer is designed to handle standard 1-1/4″ cork, burl & colored rings with or without a center hole. The slicer is designed to cut 1/8″ slices out of the rings. In using different types of shim materials you can cut the slices as thin as 1/32″.
These discs – when added to contrasting colored cork – make beautiful accents.
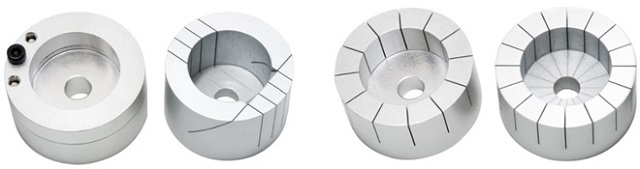
Checkerboard Cutting Jig – The checkerboard cutter is made with 12 or 16 vertical slices which will allow you to cut your cork, burl or colored ring into a variety of pie shapes which can be assembled into many different designs.
Angle/Diamond Slicer – This is a special type of cork jig designed to remove a triangle shaped piece from the surface of your cork ring and replace it with another cut from a different color ring and then assemble into diamond shapes.
This will create a very unique handle design. Along with the angle cutter, it has 3 equally spaced cuts so that you can inter mix different sections to create some handles that will really show off your custom rod.
Precision Cork Saw – This precision saw frame is designed to hold the precision blades needed to perform the slicing and cutting you will be performing with the cork slicer and checkerboard jig.
Elmer’s Wood Glue – We have found that Elmer’s Wood Glue works well for assembling the wedges. You can use any of your normal two part epoxies that you would normally use for cork rings, but Elmer’s Wood Glue cleans up well with water and applies with a brush.
Cork Handle Wedge Examples
Constructing Checkerboard or Inlay Slices
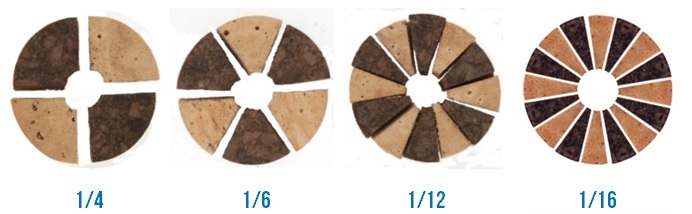
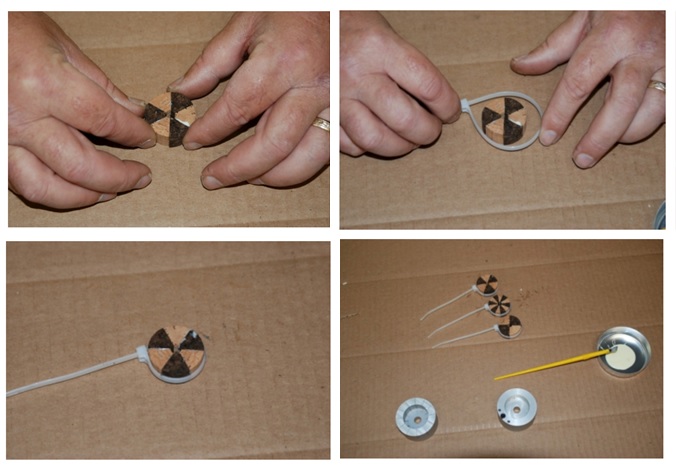
Insert cork rings into the checkerboard jig and cut wedges to the desired size (e.g. 1/4, 1/6, 1/12). Typically what you would do is use one darker burnt or colored cork ring and one regular ring so that you will get the contrast.
Cut one regular ring and one color ring into the same number of wedges. For example purposes, use 1/6.
After you have the wedges cut, squeeze out a small spot of glue onto a piece of plastic or cardboard that can be thrown away. We find it easiest to use a regular disposable brush for applying the adhesive.
Begin by applying the adhesive on one side of the wedge, select one of the opposite color wedges and apply glue to both sides of that wedge, and stick it to the first wedge you glued up.
Constructing Cork Wedges
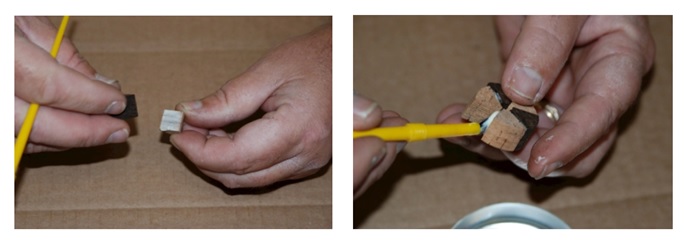
Select another wedge of the opposite color as the last and apply glue to both sides – then stick it to the previous one.
Continue this process until you have glued all of the wedges into a circle.
After forming, use a Cork Ring Tie to clamp the wedges together under pressure until they have dried. This usually takes several hours depending upon the adhesive used.
Slicing The Assembled Wedges
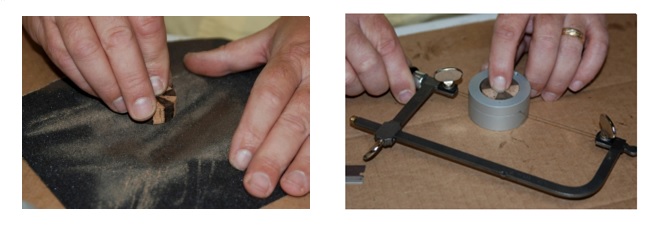
After the clamped wedges have dried forming a cork ring, you will want to cut it into slices so as to form a checkerboard pattern in a rod grip.
You will find that different types of cork rings are slightly different in thickness, so you will most likely have to sand down the finished ring to a smooth surface.
One hint is to make sure – during the clamping process – that all of the wedges are flush on a smooth surface, so you will only need to sand one side of the ring.
Also, we recommend using 300 grit sand papers on a flat surface – it works well and takes very little time to sand smooth.
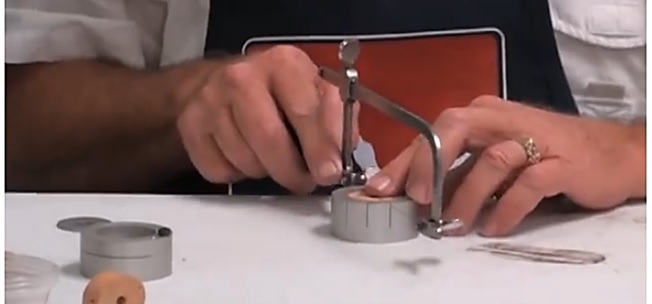
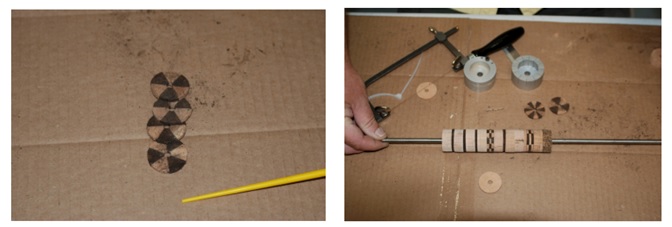
Now we are ready to make our slices. Using the slicing jig – insert the cork ring you have made into the jig. Holding it steady – insert the saw blade into the horizontal cut in the side of the jig.
Sanding Slicing Cork Rings
Each cut will create a 1/8″ slice, so you will get 4 slices out of each cork ring you made. You can also make the slices thinner by inserting some type of shim material into the bottom of the jig.
Next you will assemble your grip utilizing your new checkerboard slices and slices of your choice of cork or EVA grip material. You will assemble the grip the same way you would if you were building a grip from regular cork rings – only you will insert the disc’s to create unique patterns and designs of your choice.
Assembling The Cork Rings
For this assembly process we recommend you use the normal two part epoxy that you would for your regular handle assembly. We also recommend that you assemble your grip on a steel mandrel and utilize a cork clamp to compress the rings and minimize the glue line created by the layer of epoxy in between each cork ring.
 Use a spatula or stir stick to put a smooth layer of glue on each side of each ring, slide the ring down the mandrel until you have the length of grip you desire.
Remember – before clamping your rings together – align the checkerboard pieces so that they create the pattern you desire.
Instructional Video
In this video our friend John Rumbley demonstrates his method for creating checkerboard inlays in fishing rod grips.


