


This article was made possible by our friends at Do-It Molds, check them out!
If you haven’t already, it’s time to add the hair jig to your jigging arsenal. Whether you are bass fishermen, walleye fishermen, or even chase panfish, the hair jig can be deadly on fall and spring fish.
In this article Tommy Skarlis shows how to tie up your very own hair jigs. The possibilities are endless and it’s time to start making your own hair jigs today!
There are many jig heads available, and most all work very well. For the purposes of this article, Tommy will be using the Ultra Minnow Jig Head.
Be sure to check out Tommy’s video at the end of this post!
The Ultra Minnow is a great choice for building a custom hair jig because of the following features:
- The 90 degree eye helps to present the jig in a horizontal swimming motion, which best mimics a natural minnow’s action.
- The jig head conveniently has eye patterns where you can either paint eye patterns, or use premade eyes.
- It has a collar on the jig where you can either use a soft plastic trailer, or use it as a wrapping area for your hair like we are highlighting here.
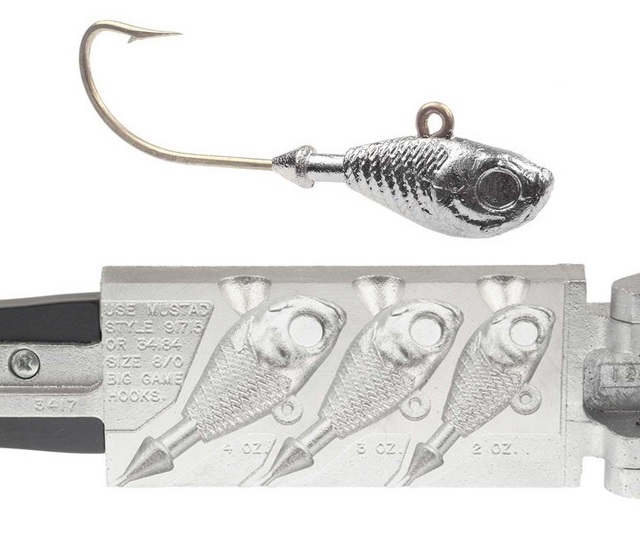
It is also offered in the most popular weights and hook combinations.
List Of Materials
Here is a list of materials and tools you will need to complete this Hair Jig project:
- Do-It Ultra Minnow Mold
- Lure Making Paint
- Thread Bobbin
- Fly Tying Vise
- Animal Hair or Material
- Head Cement (Glue)
Creating Your Custom Hair Jig
Here are 10 easy steps to build your own custom hair jig:
1. Pick out a jig mold.
We are using Do-It Molds Ultra Minnow in this example, but you can apply these techniques to add hair to any jig head you wish.
2. Paint the jig head first.
While not part of the article, there are a number of great paints and finishes you can use to get the effect you desire. Ideally, you should have the eyes completed too.
3. Place your jig head in a vise grip.
You don’t need a fancy vise for this, but it does need to firmly hold onto the jig.
4. Start Your Wrap
Thread your bobbin and get it started by wrapping several times around the jig collar. Let the thread hang while you get your animal hair or material.
5. Assemble the animal hair.
Assemble the animal hair (or material) you want to use, and trim the end that will go at the jig head so it is straight. This is optional, but will help have a professional look when completed.
6. Place the animal hair on the jig collar.
Hold it in place with one hand. With your other hand, grab the thread bobbin and gently wrap your thread several times around the hair and collar.
Not too much tension to start; you just want things to get started. After 6 to 10 wraps, then start to increase the tension on your wraps.
Although optional, we recommend tightly wrapping the entire collar to start, and then work back to the jig head. To get a nice streamlined look, wrap your thread more times around the jig head, and use less wraps as you move towards the base of the collar (hook end). This will give you a nice tapered look to your custom hair jig.
7. Tie your thread off when done.
Try using a little (very little) finishing glue to secure your thread work. You can use any finishing glue, or head cement for this, just be sure to let dry before use.
8. The hair jig is complete.
Most leave the hair as is, but if you desire, you can trim the hair while it is still in the vice. For example, if you want more of a shad dart look, then you can trim the ends of the hair cluster at a 45 degree angle.
9. Mission accomplished!
You have just made your own hair jig. Now that you know how to do it, try experimenting on other jig types.
10. Go catch of fish!
Remember, nothing beats catching a fish on a custom jig that you just made yourself!
Well, there you have it, ten easy steps to make your own custom hair jig.
Here is the Tommy Skarlis video that inspired this post.


